When working with automation envelopes in REAPER there are several situations where automatic transitions are created. In this post I will attempt to show each of these situations, and where to find that preference that sets the timing of this transition.
For further information on automation modes, and some tips & tricks with automation check out these posts
REAPER Automation Modes Explained
7 Tips for Automation in REAPER
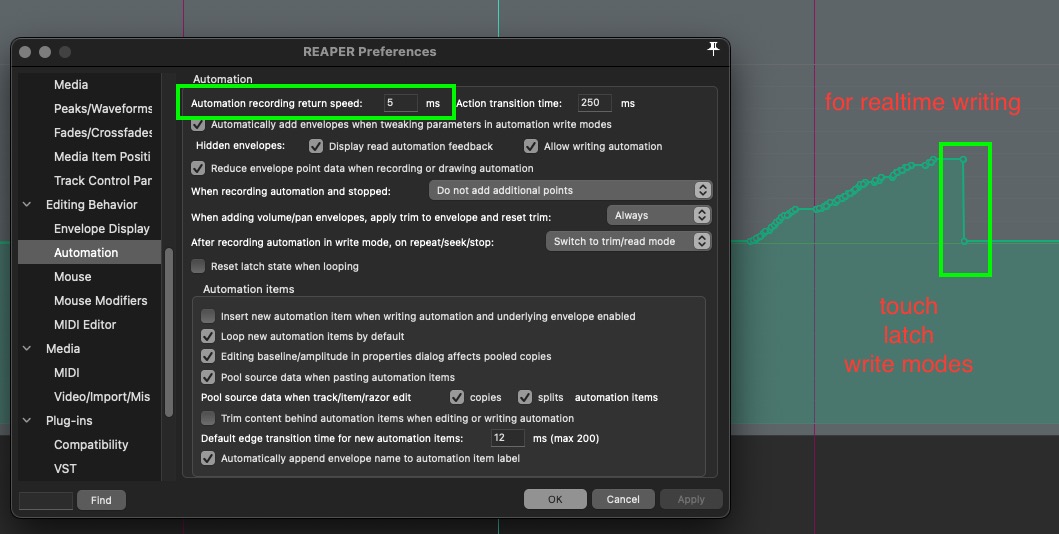
Automation recording return speed
This preference sets the time between the currently writing envelope and any existing envelope value while realtime writing automation in touch, latch, or write mode.
Action transition time
This preference applies to actions starting with “write current values for actively writing envelopes…” which are most often used in Latch Preview mode. Latch Preview is not like the other realtime modes where values are continuously written. Instead, in this mode only the current value is used and is written to beginning, end, selection on all actively writing envelopes (anything you touched since entering this mode).
Transition time for automatically created envelope edge points
This transition is used along with the mouse modifier “move envelope segment”, envelope lane trim slider movements with time selection, and action “Envelope: Insert 4 envelope points at time selection”. These transition points are automatically created outside of the time selection.
This preference is also used when moving or pasting items, if the option “Move envelope points with media items”, or if razor edits include envelopes.
Default edge transition time for new automation items
This is a transition we can’t see in the envelope lane but REAPER does automatically when playing back to smooth going from track envelopes, or current value (if underlying envelope is disabled) and automation items.
In the second image below you’ll see the rendered audio result with maximum 200ms and minimum 0ms
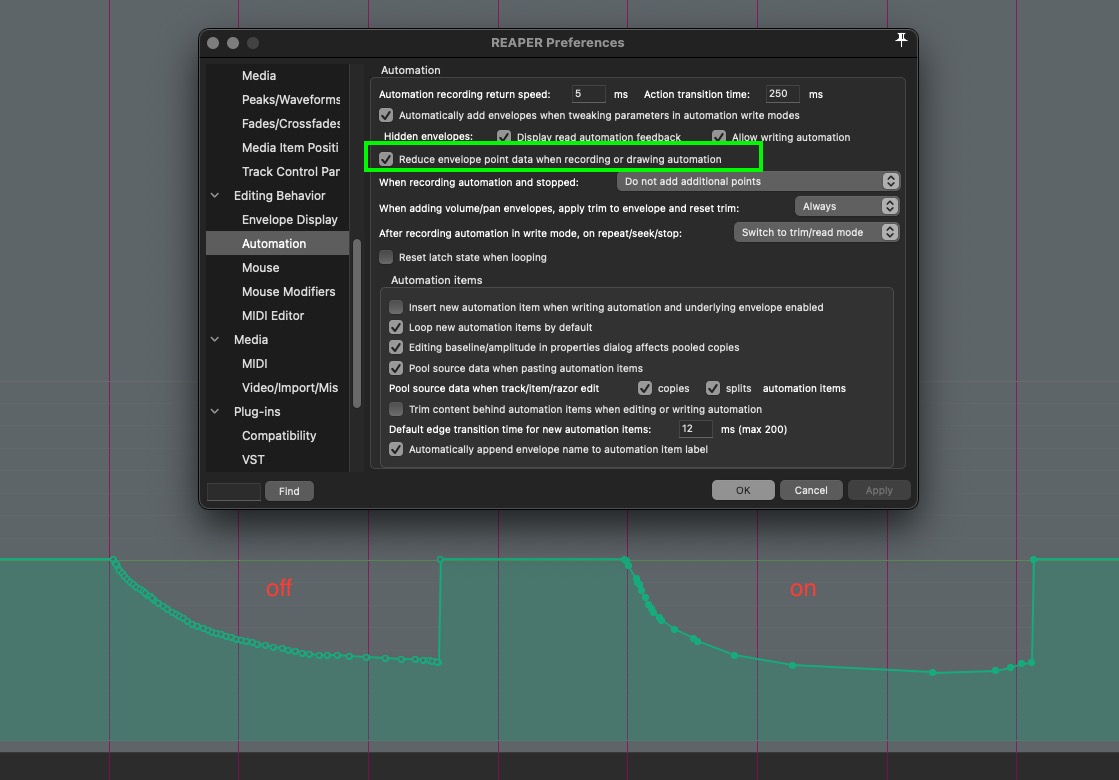
Reduce envelope point data when recording or drawing automation
This is not really a transition but since I have your attention, this preference removes redundant envelope points when recording automation (realtime with a mouse or controller), or drawing with mouse (freehand draw envelope ignoring snap.)
I recommend you keep this on to reduce visual clutter, and the result should be almost identical since redundant points don’t change the value.
Redundant points can further be removed with action “Envelope: Reduce number of points…”
Creating longer transitions with custom actions
The transition time you set in the preferences won’t always be best for every situation, but it’s also tedious to undo, change the preference, then write the automation again. You may find these custom actions helpful.
Custom: add envelope transition left of cursor
View: Move cursor left to grid division
Envelope: Insert new point at current position (do not remove nearby points)
SWS/BR: Move edit cursor to next envelope point and select it
Remove items/tracks/envelope points (depending on focus)
Custom: add envelope transition right of cursor
View: Move cursor right to grid division
Envelope: Insert new point at current position (do not remove nearby points)
SWS/BR: Move edit cursor to previous envelope point and select it
Remove items/tracks/envelope points (depending on focus)
To use these, park your cursor at a transition point, and run the action. They use the grid size so they’re quite flexible, and allow you to add transitions within a selection rather than only outside like the defaults. These don’t work in automation items.
So that’s it. I truly hope you found this information helpful, and now have a better understanding of automation envelopes in REAPER. Now put this knowledge to use in your next project!
🦋 BlueSky – https://bsky.app/profile/reaper.blog
📘 Facebook Page – https://facebook.com/thereaperblog
🤷 Facebook Group – https://facebook.com/groups/reaperblogcommunity
👏 Patreon – https://patreon.com/thereaperblog
📷 Gear I use – https://kit.co/reaperblog
Comments
One response to “Understanding REAPER Automation Transitions”
Awesome stuff, thank u
I never realized why my Future Bass envelopes were so slugish few years ago. Now I know – cuz automation was smoothed.
Thank you