This is a guest post by Michael Klier, sound designer for games and VR, and developer of ReaperWRB. You can reach him through his website or on Twitter
During my current work on the HTML5 game Service Workies, a PWA Mastery Game to learn Javascript’s Service Workers by geddski, we decided to use the Audio Sprite feature of PixiJS Sound instead of loading/playing individual sound effects.
The main goal was performance optimization by reducing the number of download requests. The total number of sounds in the game had already grown to over 250, including variations.
What are audio sprites and why use them?
If you are working in games, especially 2D games, you might be already familiar with the term “sprite”, or “spritesheet”, in context of animations.
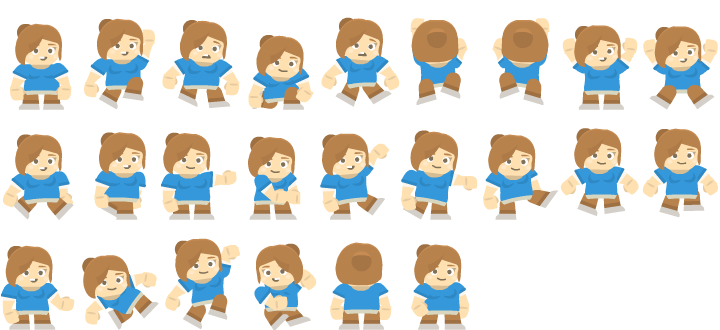
For those of you new to game development, a spritesheet is basically a single image which, for example, contains all poses of a character in a predefined grid (i.e. 128×128 pixel).
The game engine’s animation system then renders these images consecutively as one fluid animation. Like a flip book.

Image from the awesome free Kenney 2D assets: https://kenney.nl/assets/platformer-characters-1
The concept behind audio sprites is kind of the same. Here we have a single audio file that contains all the sound assets for one character for instance.

PixiJS Sound can load such a sprite file and lookup/play individual sounds with provided start/stop times. More on that later.
Preparing and exporting the audio sprite and timestamp data from REAPER
To setup an PixiJS Sound audio sprite we need two things, the audio file and the information of the start/end times of each individual sound it contains.
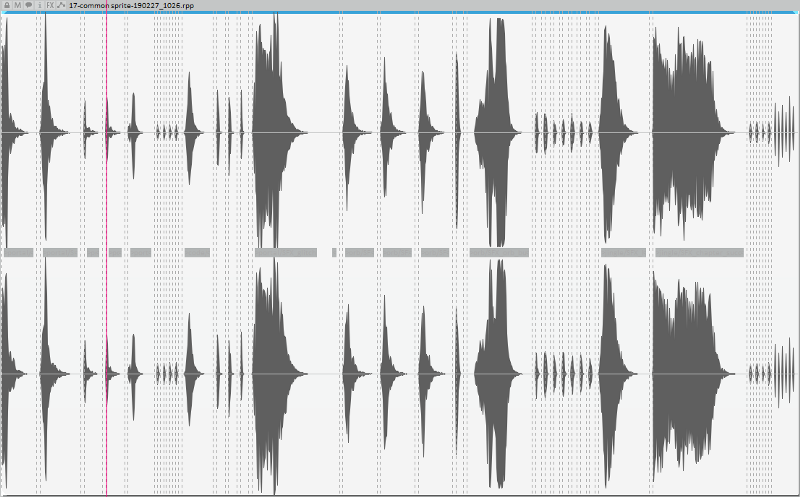
We will handle the audio sprite creation in a dedicated REAPER session. After importing all individual sounds to one track, we first need to make sure that we leave a tiny amount of space between the sounds.
The SWS extension for REAPER has just the right tool for this job:
Xenakios/SWS: Reposition selected items…
We’ve decided to leave 0.3sec of space between each sound, which worked well in our case, though less might work too. After spreading out the items we create regions for all the individual sounds. The region names will serve as the keys for PixiJS Sound later. To make life easier I’ve exported the sounds with the correct naming convention beforehand and use the following SWS action to create the regions:
SWS: Create regions from selected items (name by active take)
Next we have to somehow export the region information to the format PixiJS Sound expects.
Here’s the code snippet for the sprite object definition from the PixiJS Sound documentation:
const sprites = {
  'alien death': { start: 1, end: 2 },
  'boss hit': { start: 3, end: 3.5 },
  'escape': { start: 4, end: 7.2 },
  'meow': { start: 8, end: 8.5 },
  'numkey': { start: 9, end: 9.1 },
  'ping': { start: 10, end: 11 },
  'death': { start: 12, end: 16.2 },
  'shot': { start: 17, end: 18 },
  'squit': { start: 19, end: 19.3 }
};
We have a key per sound for which we will use the region name, and the start/end time of the region.
REAPER has built in support for exporting the region information as a comma separated CSV file. Of course we could use just manually convert the data of that file by hand, which is what I too did at first. But if we update our sprite a lot, this will get very tedious quickly.
Thankfully Raymond Radet, better known as X-Raym in the REAPER community, has already done much of the heavy lifting and created a Lua script that exports the region information to a CSV file. I’ve built upon that and altered it to export a javascript file with the PixiJS Sound sprite format instead.
You can download the script here.
Now we can manually render the project, then export the region information for using it with PixiJS Sound using our script each time we change something, or we take it one step further, and create a custom REAPER action that will perform all that in one single step.
Here’s the action definition:
Custom: export_audio_sprite
   SWS: Delete all regions
   Item: Select all items
   Xenakios/SWS: Reposition selected items...
   SWS: Create regions from selected items (name by active
 take)
   Time selection: Set time selection to items
   File: Render project to disk...
   Script: export_regions_to_js.lua
We could even go as far and use one of the render actions that just renders the project using the last render settings, but I like to make sure the render settings are correct on each render.
But what about mono assets?
That’s one drawback of this system as there’s no way to mix mono/stereo assets in the same file, and you end up rendering the true mono assets stereo too.
PixiJS sound however provides a Mono filter which combines all channels into a mono channel at playback. We haven’t tried that yet, but it might be worth experimenting with if needed.
Conclusion
After switching to audio sprites we went from initially ~240 download requests down to just 8, which was a great improvement for page loading. We also ended up with a quite noticeable CPU load improvement (>50% actually).
Finding a time efficient workflow to produce the correct assets within REAPER, as opposed to relying on external tools, was pretty straight forward, thanks to it’s flexible action system and scripting feature.
If you’re into PWA development and want to learn more about Service Workers in a fun way, check out Service Workies, it’s free!
Links
Service Workies = https://serviceworkies.com/
gedd.ski = https://gedd.ski/
Audio Sprite = https://pixijs.io/pixi-sound/examples/sprites.html
SWS extension = http://www.sws-extension.org/
Raymond Radet = https://www.extremraym.com/en/
Mono filter = https://pixijs.io/pixi-sound/docs/PIXI.sound.filters.MonoFilter.html


Comments
One response to “Exporting audio sprites for PixiJS with REAPER”
Wow glad my script help you build your own custom tool 😀 This is defintly why scripting is cool… and sharing too 😛